So you want to light up a piece of terrain. Here is what you will need:
- Soldering Iron and solder.
- LEDs, preferably 'through-hole.' (They have long legs, see the picture below)
- Battery holder, preferably with integral switch.
- Wire, preferably 2 different colours, red and black highly recommended.
- Resistors, I will detail what value later.
- Terrain to light up, preferably with space to hide battery pack.
- Drill and hole saw.
- Clear plastic sheet. Blister packs are perfect.
- Sand paper, medium grit. (Between 300-600)
- PVA glue, hot glue gun or whatever your preference.
 |
| Hole saw, 'Through hole' LED & Battery pack with switch |
So the first step is to give yourself access through your terrain, in my case a 2 story building. Take your drill and hole saw and carefully cut a hole in the middle of the floor. You don't need a pilot hole for this but be aware that the hole saw will twist and bite easily, be really careful.
 |
| Before sanding. |
 |
| After sanding. |
Now for the tricky part. If you have never soldered before you may want to get someone who has to show you how it is done. Alternatively there are probably some videos online to help you. In any case be careful, soldering irons run at 300 degrees (Celsius) which is instant scarring hot.
Take your first LED and set it somewhere stable (I used some clamps for this, it may be worth investing in some if you don't have any) and identify the long leg. The long leg has to connect to +ve on the battery (red lead) otherwise it wont work. DON'T CUT THE LEGS! We need them, trust me. Solder a wire to this leg. If you have red wire use that. Then solder a different coloured wire to the short leg, preferably black. You will notice I am using grey and brown as I ran out of red and black... Repeat this process for however many LEDs you are using, making sure to use the correct colour on the correct leg.
 |
| One LED, all hooked up. |
Resistor Value = (Voltage of Batteries) - (Voltage of LED) [varies, usually 1.5-2.5 Volts]
20mA * (# of LEDs)
I am using 4 LEDs, 2 AA batteries and one LED needs about 1.5 volt, so I have 1.5V and a total of 80mA. This means I need a resistor of 18.75Ohms. Now you wont find this on the shelf so we will just round up to 22Ohms. That makes sure the LEDs wont run too hot.
With the resistor chosen you need to solder one end to the red wire on the battery pack. The other end will be soldered to all the other red wires you have, depending on how many LEDs you used. Then you need to solder all your black wires to the black wire on your battery pack.
 |
| Commonly known as a rats nest... |
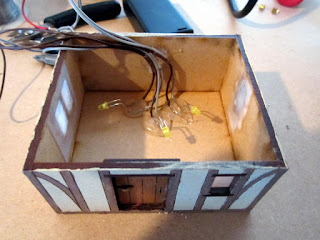
I promise it gets easier from here! Now you want to glue your first LED into your terrain, placement is up to you, I am trying to simulate a fireplace, so will be grouping the LEDs together near the back wall, away from the windows.
 |
| First LED in place. |
 |
| 3 LEDs to simulate a fireplace |
Were you wondering what happened to the 4th LED? I have saved it for the second floor. From the position it is in it only illuminates one window, giving the illusion that there may be a wall between them, or perhaps someone working at a desk by candle light.
The final step, well done for making it this far! This is just a housekeeping thing really, I have glued the resistor and rats nest down so that they wont ever short together. I recommend doing this if you don't have insulation tape or heat shrink, or if you don't know what those things are...
 |
| Quick test once everything is in. |
 |
| Battery pack squirrelled away, switch accessible - of course! |
 |
| The final product! |
I hope you made it this far and injury free, no less. This takes me about 45 minutes per building, with some down time waiting for soldering irons and hot glue guns to heat up. This can be applied to many different kinds of terrain limited only by your imagination and battery size! One of my next tutorials will deal with getting lights into smaller spaces and hiding away those batteries. Until next time!


No comments:
Post a Comment