Sunday 23 February 2014

Week 8 - Deadzone Terrain Review

So a little bit more distracted this week as I was still working away at my Deadzone terrain. I decided to do a bit of a review and give some hints to making things for those of you who might decide to pick some up.

What is it?

The 'Core Worlds' scenery pack is a set of 22 3" square 'sci-fi' terrain panels, 6 half size panels and various other barricades, obstacles and connectors. It is highly customisable and you can build just about anything you want out of the pieces.

The Good

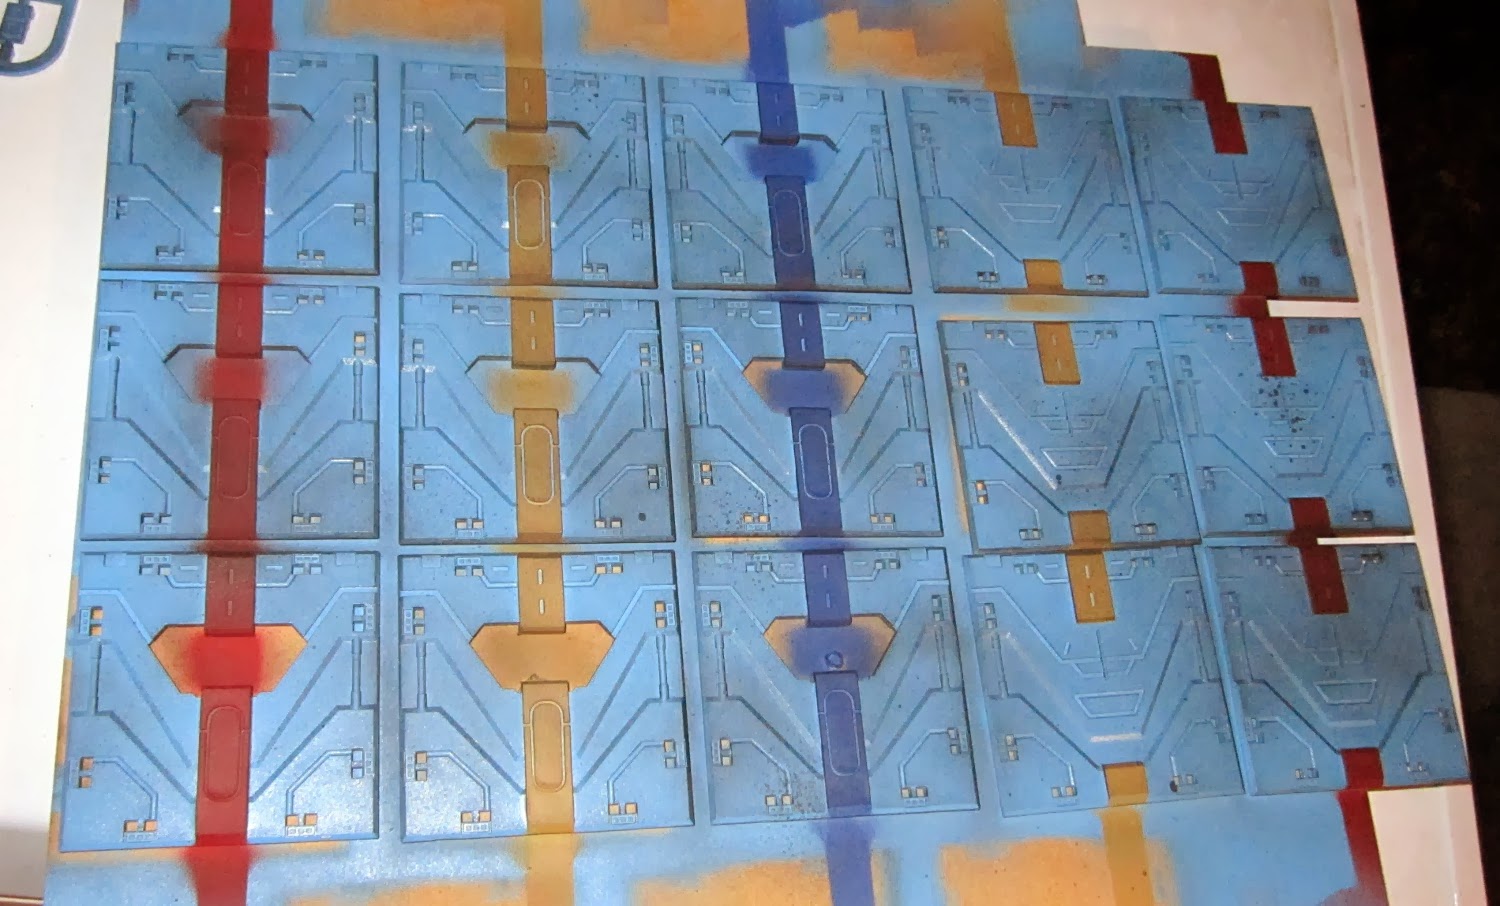
You really can build just about anything you want to out of this set. It retails for about the same as the GW Cityfight buildings but as all the panels are the same size (including floor panels) you can build more things with a single kit. It also seems to go much further than the GW kits. Not only that but the connector system can make for very rigid structures, letting you build much higher and without the 'not so straight' issues the GW kits can have. The terrain also looks really good, even with a low effort paint job.

The Bad

So it was originally advertised as being able to be assembled and disassembled. While you can do this, I wouldn't recommend it. The connectors can get quite stuck and snap off when you try and remove them. Now while this could be filed in the 'ugly' section below I found that you really wouldn't want to assemble your terrain just before a game anyway. I've been plugging away at mine for about 6 hours or so of just assembly, not exactly suitable for 'just before playing' a game...

Some of the parts restrict assembly. Actually just one really, the extra straight connectors that allow the terrain to stand freely. It is great for making free-standing walls and barricades but you cant put a roof piece above/below it. The only other piece that is a bit iffy is the triangle support piece, mostly because with the placement of the connector ports they can overhang the windows/doors of the tile it is connected to...

You only get one set of connectors with each set. You could kind of do with two per set, as you start to feel quite limited as you build.

The Ugly

The main issue here is the connectors. The idea was really good but falls over in mass production. The mould lines and slight tool misalignments mean that sometimes the connectors really don't want to go in. A little bit of filing goes a long way when building this product. It also becomes essential if you paint it first...

Conclusion

Despite the issues I would still highly recommend the terrain, I'm even picking up 4 more sets. It does look really nice, goes together securely without glue and one box goes quite a long way for the price. Give it a go, it is also suitable for Infinity as well as 40k, although the lack of skulls will make it stick out!

Tips

  1. Plan out what you want (even just roughly) before you start. Some planning will help make sure you don't get stuck trying to add panels in awkward positions.
  2. Get a small square file. Seriously, this is mandatory. If you are going to paint after assembly then just have a light file of the connector ports on all the tiles. It will save you headaches later.
  3. Decide early if you are going to paint before assembly or after. If you are going to paint before assembly I suggest putting bluetac or similar in the connector holes when painting. I didn't and now I have to file almost every hole to make connectors fit.
  4. Don't get paint on the connector tabs. You will just have to scrape it off again. Save yourself some time, mask them off.
  5. Buy spare connector sprues. One extra per terrain set should be good, possibly even two. It will give you far more options as you build, you won't regret it.
  6. If you don't get extra connectors you can be fairly sparing with them and still get a rigid structure. I realised this about half way through assembly, you only really need about 2/3 of the maximum number of connectors on a tile to make a solid structure. I have about 2 tiles left over (I got a bonus sprue with mine so should have 4 less!) and a few barricade walls but absolutely no connectors left.
  7. Once you are happy with it you may want to glue it together. I haven't done this yet but expect to once I get a couple games in.
  8. If you get nothing else, try the accessory sprues. They aren't available singly yet but you get 2 crates, 2 double hazard barrels, 2 triple barrels, 2 ladders, 2 street lamps (double as wall connectors), 4 railings and 6 ceiling supports. All for $5 US during the kickstarter, so maybe $10-12 NZ if they become available separately.
The pictures below are what 2 sets can make with some slightly sparing connector use...


I finished trimming up the last of the accessory sprues and undercoated them today and also built some free-standing billboards for my terrain competition entry.


At least now that I have that all together I can feel comfortable going back to my terrain competition entry. Still so much to do, so little time...

Apartment Building
 - Windows
 - Balconies (x2)
 - Air conditioner
 - Ladders
 - Fences
 - Paint
Raised Garden
 - Make framework
 - Detail frame panels
 - Populate garden
 - Fences
 - Paint
Shipping Containers
 - Add doors
 - Fine detailing (windows, signs, vents etc.)
 - Paint
Crates
 - Paint 36 large crates
 - Trim and paint 24 small crates
Paint K-Rails
Board
 - Touch up paint
 - Add details
 - Add plastic to road edges
Paint up Billboards
Catwalks
 - Build
 - Paint

Day 54
0/54 Painted/Days passed
0/19 Painted/Bought
Goals:
Build a permanent gaming table.
Complete my entry for the terrain competition.
Build a Kings of War army for playing with.
Build and paint a set of Deadzone battle groups.
Build and paint a full Malifaux crew.
Finish all of the Dreadball teams and MVPs.
Finish painting an Infinity group.
Make some headway on my Warpath fluff.

Sunday 16 February 2014

Week 7 - Distracted By Deadzone

The title says it all really... Between waiting for parts and general laziness I haven't made any further progress on my Infinity terrain. When my weekend gaming got cancelled I decided to give my Deadzone terrain a quick spray paint to move it all along. The photos are a bit washed out unfortunately as the lighting was pretty bad... Basically I gave them a light blue base coat followed by a dusting of black spray. They look reasonably worn as a result, next I will sponge on some browns to up the wear-and-tear.


I hope to get a game in sometime this week, then I can figure out if I have enough terrain (NEVAR!!1!! lol) and then decide which sets I want to pick up from the final survey.

I also spent some time during the week making an abridged version of the Infinity rules (I use the term loosely as it is currently more pages) that includes a glossary. Hopefully I can finish it up in a week or so, making finding the relevant rules sections much faster! I also assembled more of my Infinity models, just a couple to go and they will all at least be assembled.

Day 47
0/47 Painted/Days passed
0/10 Painted/Bought
Goals:
Build a permanent gaming table.
Complete my entry for the terrain competition.
Build a Kings of War army for playing with.
Build and paint a set of Deadzone battle groups.
Build and paint a full Malifaux crew.
Finish all of the Dreadball teams and MVPs.
Finish painting an Infinity group.
Make some headway on my Warpath fluff.

Sunday 9 February 2014

Week 6 - The Finer Details

So I made more progress on the terrain project this week. I added some more details to the containers, I have about 10 more that need detailing. I am a bit torn on how I will paint them all up though. I had originally thought that I would make them all clean and look like a well maintained city area. On the other hand I keep seeing lots of opportunity to really dirty it all up, adding lots of posters, dirt and other grunge. Anyway here are some photos of three different containers.


I made a little progress on the apartment complex as well, putting in the sliding doors and marking out a decorative plate. The decorative plate will sit out from the building, I haven't decided how far yet though. I am tempted to make it part of the balconies, as the fire escape, but it would be kind of difficult to access. I also have to decide if I will make it out of MDF or acrylic. The acrylic will be harder to do and more brittle but have a nicer finish. A picture of the layout is below.


The last bit of progress I made was the detailing on the raised garden. The container details are now all ready, unfortunately I made a mistake when I made the frame. I forgot to account for the thickness of the top plate so now it is about 5mm too tall. Of course I realised this after putting in all the details... Never mind, it still looks okay if I don't have any other containers too close.


Apartment Building
 - Windows
 - Balconies (x2)
 - Air conditioner
 - Ladders
 - Fences
 - Paint
Raised Garden
 - Make framework
 - Detail frame panels
 - Populate garden
 - Fences
 - Paint
Shipping Containers
 - Add doors
 - Fine detailing (windows, signs, vents etc.)
 - Paint
Crates
 - Paint 36 large crates
 - Trim and paint 24 small crates
Paint K-Rails
Board
 - Touch up paint
 - Add details
 - Add plastic to road edges
Paint up Billboards
Catwalks
 - Build
 - Paint

Day 40
0/40 Painted/Days passed
0/10 Painted/Bought
Goals:
Build a permanent gaming table.
Complete my entry for the terrain competition.
Build a Kings of War army for playing with.
Build and paint a set of Deadzone battle groups.
Build and paint a full Malifaux crew.
Finish all of the Dreadball teams and MVPs.
Finish painting an Infinity group.
Make some headway on my Warpath fluff.

Sunday 2 February 2014

Week 5 - Making Progress

So I probably could have been more productive this week but I just haven't been in the mood lately. I'm sure we are all familiar with that feeling. I have made some progress on the shipping container details, including adding doors and making windows. I also plan on adding fans, hatches and vents. The end goal is to make the containers look like a range of homes and food/goods vendors.


I also made some progress on the raised garden, the frame is finished and the basic details have been started. The next step is to put the details on to make it look like containers and then add in the garden details. I'm fairly happy with how it is progressing, just more pace would be good!


I am going to order some tinted blue acrylic sheet in the next week or so. I'm going to use it to make ramps, gantries and fences. I've decided that it should be fairly easy to do and so not take long to make a nice pile of good looking terrain pieces.

Apartment Building
 - Windows
 - Balconies (x2)
 - Air conditioner
 - Ladders
 - Fences
Raised Garden
 - Make framework
 - Detail frame panels
 - Populate garden
 - Fences
Shipping Containers
 - Add doors
 - Fine detailing (windows, signs, vents etc.)
Crates
 - Paint 36 large crates
 - Trim and paint 24 small crates
Paint K-Rails
Board
 - Touch up paint
 - Add plastic to road edges
Paint up Billboards
Catwalks
 - Build
 - Paint

Day 33
0/33 Painted/Days passed
0/10 Painted/Bought
Goals:
Build a permanent gaming table.
Complete my entry for the terrain competition.
Build a Kings of War army for playing with.
Build and paint a set of Deadzone battle groups.
Build and paint a full Malifaux crew.
Finish all of the Dreadball teams and MVPs.
Finish painting an Infinity group.
Make some headway on my Warpath fluff.