Thursday 31 January 2013

Link Signatures

Just a quick post today to show of the signatures I will be using in various forums, blatantly trying to get more views here... If they worked, welcome!


More will be added to this post once I get on to other projects.

Monday 28 January 2013

Week 4 - Back on the Wagon

So I didn't get everything done. Just going to get that out of the way now. I did however complete the paint jobs on Maelock and on the Wrastler. That leaves Caliban and the two Witch Doctors who I hope to work on this week. Pictures of the pair below.


I also had a chance to sit down and figure out what scheme to paint both my Forge Fathers and Corporation and so here they are. This pushes up the count by 8 this week and opens the door for filling in gaps in future weeks. The Forge Fathers are based on the Word Bearers chapter colour scheme and the Corp are based on the German military grey uniform with a dark blue armour plating. Both schemes are relatively quick to do and look pretty decent. Sorry if the contrast on the pics are funny as my laptop screen is failing so the colours may be a bit off.

Forge Father team
Close up of the Sergeant
Corporation test model

The stats:

Day 28
62/28 Painted/Days passed
62/366 Painted/Target (17.9%)
18/37 Blindwater Congregation (48.6%)
43/51 Dreadball (84.3%)
5/88 Forge Fathers (5.7%)
1/104 Corporation Marines (0.9%)
With more to come...

Thursday 24 January 2013

Tutorial - Adding LEDs to a No-Access Structure

Since I have been asked a couple times about how to do this I thought I should probably do a tutorial for you all. Note the title specifies 'no-access structure,' this means that models will never be inside this structure, giving us more space to play with. I have some ideas on how to do lights in accessible structures, look out for a tutorial later in the year. (Probably, I need to get some new kits for that...)

So you want to light up a piece of terrain. Here is what you will need:

  1. Soldering Iron and solder.
  2. LEDs, preferably 'through-hole.' (They have long legs, see the picture below)
  3. Battery holder, preferably with integral switch.
  4. Wire, preferably 2 different colours, red and black highly recommended.
  5. Resistors, I will detail what value later.
  6. Terrain to light up, preferably with space to hide battery pack.
  7. Drill and hole saw.
  8. Clear plastic sheet. Blister packs are perfect.
  9. Sand paper, medium grit. (Between 300-600)
  10. PVA glue, hot glue gun or whatever your preference.
Hole saw, 'Through hole' LED & Battery pack with switch
So the first step is to give yourself access through your terrain, in my case a 2 story building. Take your drill and hole saw and carefully cut a hole in the middle of the floor. You don't need a pilot hole for this but be aware that the hole saw will twist and bite easily, be really careful.

With that done you now want to work on the windows. Take some old blister packaging and cut out the large flat piece from the back. Now if you leave it like this then you will clearly see the LEDs, which kind of spoils the illusion. What you want is to make it into a diffuser, which is easily done by rubbing it with sand paper. Start by rubbing in one direction, then when it is nice and scratched up, turn it 90 degrees and sand it some more. This will make it look less uniform and will hide the shape of the LEDs behind your windows.

Before sanding.
After sanding.
With that done you will want to cut the plastic into pieces, making sure they are larger than the window, and glue them into place, I used PVA as the building is made of MDF. Make sure the sanded side is inside the terrain, this will look nicer.

Now for the tricky part. If you have never soldered before you may want to get someone who has to show you how it is done. Alternatively there are probably some videos online to help you. In any case be careful, soldering irons run at 300 degrees (Celsius) which is instant scarring hot.
Take your first LED and set it somewhere stable (I used some clamps for this, it may be worth investing in some if you don't have any) and identify the long leg. The long leg has to connect to +ve on the battery (red lead) otherwise it wont work. DON'T CUT THE LEGS! We need them, trust me. Solder a wire to this leg.  If you have red wire use that. Then solder a different coloured wire to the short leg, preferably black. You will notice I am using grey and brown as I ran out of red and black... Repeat this process for however many LEDs you are using, making sure to use the correct colour on the correct leg.

One LED, all hooked up.
The next step is to select a resistor for the circuit. The resistor is important as it limits the current to the LEDs, which will make them last longer. MUCH longer. Math time! Using the equation below will let you select a resistor suitable for your project. If you need help feel free to drop me a comment at the bottom.

Resistor Value = (Voltage of Batteries) - (Voltage of LED) [varies, usually 1.5-2.5 Volts]
20mA * (# of LEDs)

I am using 4 LEDs, 2 AA batteries and one LED needs about 1.5 volt, so I have 1.5V and a total of 80mA. This means I need a resistor of 18.75Ohms. Now you wont find this on the shelf so we will just round up to 22Ohms. That makes sure the LEDs wont run too hot.

With the resistor chosen you need to solder one end to the red wire on the battery pack. The other end will be soldered to all the other red wires you have, depending on how many LEDs you used. Then you need to solder all your black wires to the black wire on your battery pack.

Commonly known as a rats nest...
It is a good idea at this point to test your LED circuit. This is when you realise that you soldered some the wrong way or that you have bad solder joints. Keep all the bare LED legs apart to prevent any shorts in the circuit. It pays to use fresh batteries for this test too!

I promise it gets easier from here! Now you want to glue your first LED into your terrain, placement is up to you, I am trying to simulate a fireplace, so will be grouping the LEDs together near the back wall, away from the windows.

First LED in place.
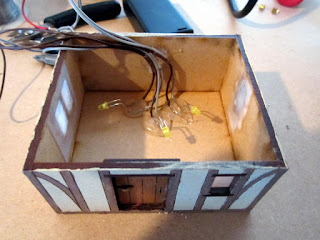
3 LEDs to simulate a fireplace
As you can see the LED legs are being used to keep the LED floating in free space. This way you can also reposition them once the glue has hardened to your liking. Don't let their legs touch though! I have also glued the cables neatly to the wall. Next up I have used PVA to glue the top floor to the bottom floor. This is a personal preference thing, I want to keep the structure strong.

Were you wondering what happened to the 4th LED? I have saved it for the second floor. From the position it is in it only illuminates one window, giving the illusion that there may be a wall between them, or perhaps someone working at a desk by candle light.

The final step, well done for making it this far! This is just a housekeeping thing really, I have glued the resistor and rats nest down so that they wont ever short together. I recommend doing this if you don't have insulation tape or heat shrink, or if you don't know what those things are...
Quick test once everything is in.
Battery pack squirrelled away, switch accessible - of course!
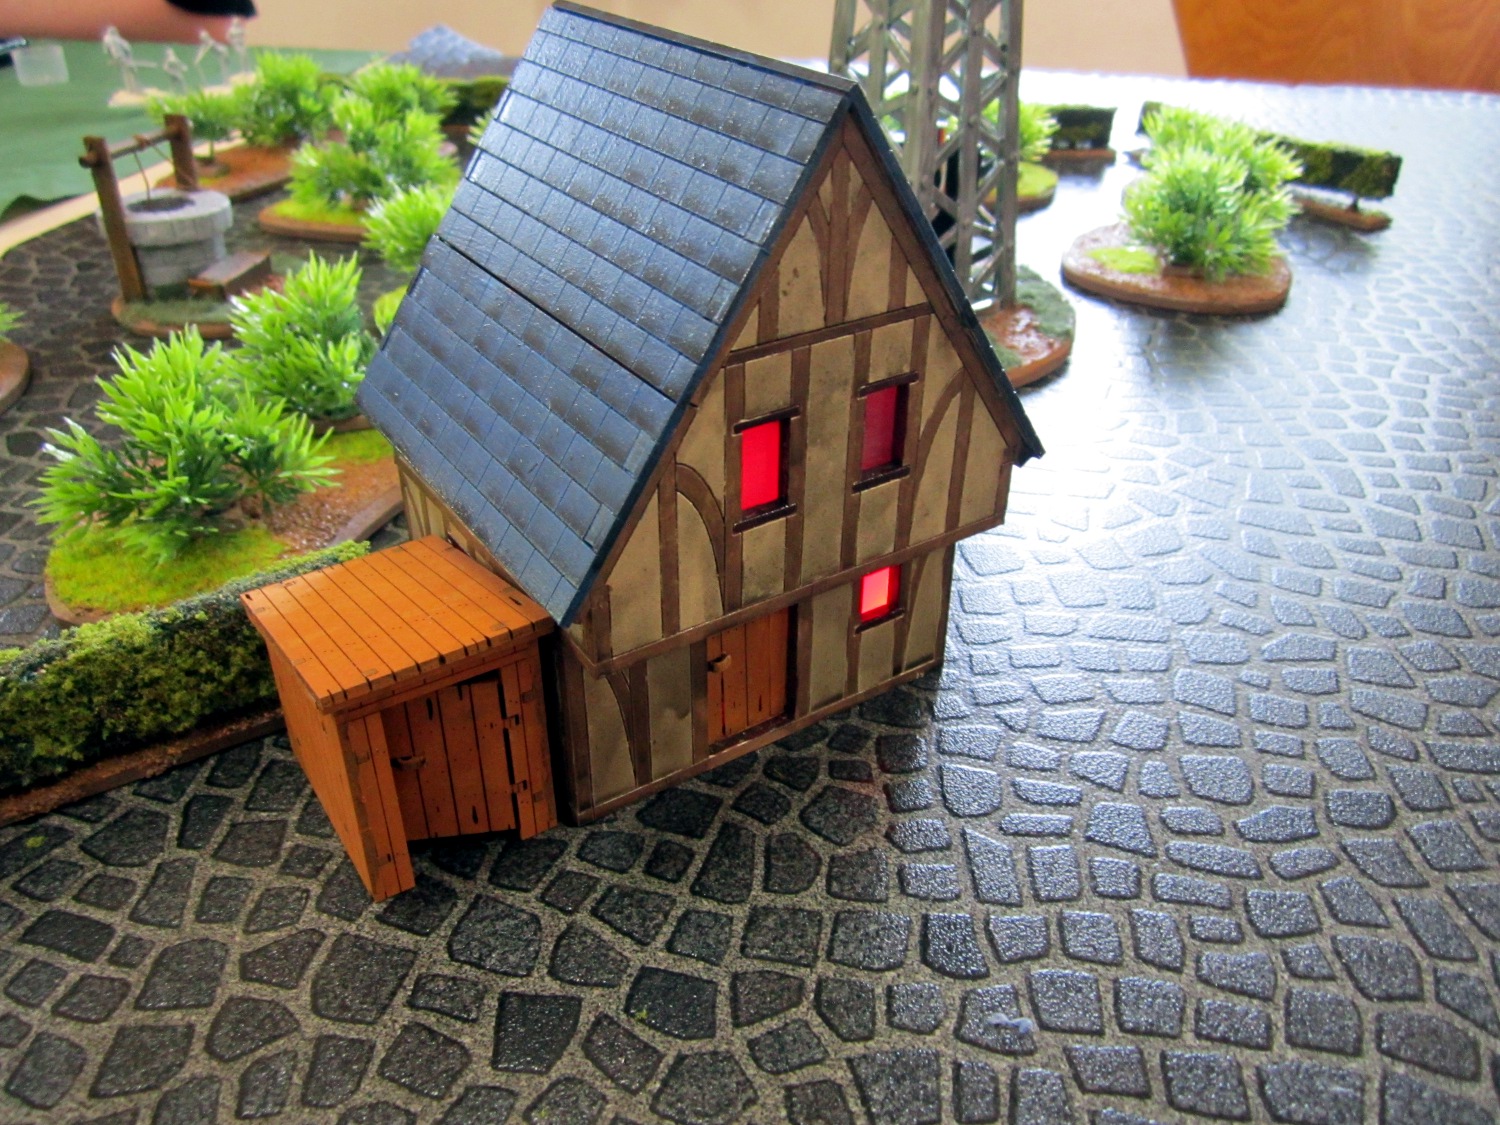
The final product!
I hope you made it this far and injury free, no less. This takes me about 45 minutes per building, with some down time waiting for soldering irons and hot glue guns to heat up. This can be applied to many different kinds of terrain limited only by your imagination and battery size! One of my next tutorials will deal with getting lights into smaller spaces and hiding away those batteries. Until next time!

Monday 21 January 2013

Week 3 - Review, Revisiting Week 2

So as I predicted there was very little painting done last week... It happens, just wasn't in the mood. (That and I read all of the Hunger Games trilogy...)

So instead here are some pictures of my terrain competition entry. Any Immortals members out there want to vote for me then email the Immortals President (or contact him in person) before the 5th of Feb, it would be much appreciated!


So the four buildings all light up and the windmill is motorised to spin. All the plants are removable to make game-play easier as well.

What is the plan for this week? Remember the models from week 2, the ones I didn't finish? Yeah, I still need to do them... Seems like a good place to start. I may splash in some other models as well, testing schemes for other systems. We will see, it is a long weekend after all!
In case you thought I had forgotten them..

The stats:

Day 21
54/21 Painted/Days passed
54/366 Painted/Target (14.8%)
16/37 Blindwater Congregation (43.2%)
43/51 Dreadball (84.3%)
With more to come...


Monday 14 January 2013

Week 2 - Dropping the Ball

So there is little to report this week. I wasn't able to get new brushes from my supplier and I didn't make any progress on any of the Gators. I have however made progress on which Dreadball team I like the most. It seems that the Forge Fathers have become my favourite despite not winning me many games.

With the terrain competition being presented in a week I have to get my entry complete so there wont likely be any progress this week. Good thing I painted all those models in week one! From there it is getting my Gators done before I start doing Hordes demos at Vagabond and Mark One in early Feb.

I have also ordered some parts from PP so that I wont have to convert the Croak Hunter, which will save some time and effort.

The stats:

Day 14
54/14 Painted/Days passed
54/366 Painted/Target (14.8%)
16/37 Blindwater Congregation (43.2%)
43/51 Dreadball (84.3%)
With more to come...

Sunday 6 January 2013

Week 1 - In review, Week 2 forcast

So the holiday period ends for me. Where did I get to? Well I only got 1 of the extra models complete, pic below.


You see I got a little distracted after my game with ManticKiwi and ended up painting some Dreadball instead. Well...


I painted up 43 dreadball models, consisting of almost all of the 4 teams (I missed one of the Veer-myn when undercoating, Doh!) and the 4 team specific MVPs. I used the Army Painter technique to get them done, learning about their Dip in the process. While they aren't painted to my usual standard they are more than sufficient for a board game. Hopefully I will be able to refine the process for when I come to doing the Mantic Corporation models. I would like to bring the standard up a bit for those models, I brushed on the dip, I am told that using another brush to remove some is a good way to clean up the results so will try that next time.

As for next weeks models, I have the slight issue that I have mangled all my nice new brushes. I have to go pick some up before I can make any progress on the Gators and so have decreased this weeks target to 5 models, as below:


A couple of familiar faces in there... Sorry for the poor quality photos, I'm in a bit of a rush this week getting prepared for work. I also have to make serious progress on my terrain comp entry... Oh where did the holiday break go?

The stats:

Day 6
54/6 Painted/Days passed
54/366 Painted/Target (14.8%)
16/37 Blindwater Congregation (43.2%)
43/51 Dreadball (84.3%)
With more to come...

Thursday 3 January 2013

Off to a Good Start

So we are 3 days in to the new year and I promised some progress pics. Despite some distractions I have got all of this weeks models painted! I have started on the bases but they will take a few days to get to the final completed stage. I also have to go back and fix a couple spots of chipped paint and then varnish them to keep them looking nice and pretty. So here are the progress shots:


This gives me a max and a min unit of Gatormen Possie (2nd unit leader not shown, he was the scheme test model) a Swamp Gobber team and a Feralgeist completed. This adds to my existing collection of Barnabus, a Thrullg, Croak Hunter and Bull Snapper. Obviously I am a little light on warbeasts so I have 4 more models lined up to complete by Sunday. A Blackhide Wrastler, Boneswarm, Victor Pendrake and Maelock the Dreadbound.


Aside from that I have a few painted models that fit within the colour pallet that just need a basing change or a couple of details re-painted. They are a 2nd Feralgeist and a min unit of Bone Grinders (for Calabans Tier). Then I have models that need stripping down to repaint, a Totem Hunter, Bull Snapper, Ironback Spitter and a max unit of Gatormen Possie. Finally I have 2 models that need some conversion work before painting, a 2nd Croak Hunter and a Swamp Horror. That is on top of Calaban himself and 2 Witch Doctors. Sigh, so much to do for March, not including Rask, Zombie Bog Troggs or a unit of Bog Trogg Ambushers. (All of which are waiting for release or I otherwise don't own yet.)

I did however play a couple of games of Dreadball last night with ManticKiwi which was a lot of fun. I am not however much closer to deciding which of the 4 teams I want to focus on. With only the Skittersneak Stealers left to assemble I should hopefully have a favourite chosen soon and will be able to add them to the progress bar.

Here are the totals so far:
Day 3
10/3 Painted/Days passed
10/366 Painted/Target (2.7%)
15/37 Blindwater Congregation (40.5%)
With more to come...